How to Set the Default appearance for Shapes in MS Word
After inserting a Shape in Word, one can easily change its appearance simply by using the Drawing Tools ➜ Format tab which provides us options for changing the – Shape Fill, Shape Outline and Shape Effects, but here the thing is how can one set the default appearance for shapes. To answer this question one would say that we can do it easily by right clicking in the custom edited shape and select the option that says - set as Default Shape, which would make it as a default shape. But now what it does is that, it only sets the default shape, for that particular document and not for any newly created document.
So what if we need the default shape all the time in any of our newly created document as it would be saving much of our effort and time. How can this be done? To do this we need to make changes to the template that we use for making the document. For this we have to go into the template that is used to create the document and inside of that we have to make changes to the shape and set it as default and save the whole template as before. Unless a special template for our document is set the default template is going to be the “Normal.dotm”- file.
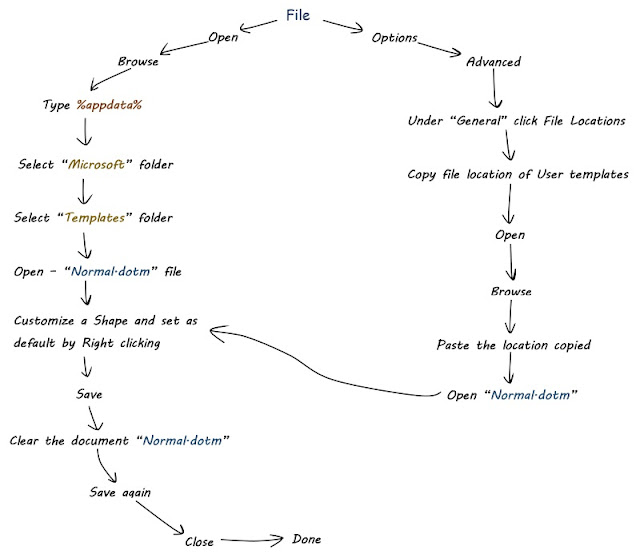
To get started, choose File ➜ Open ➜ Browse. Next, type %appdata% in the address bar of the pop-up explorer window and press enter. This will take us straight to the – “User Profile”. Now click the folder that says – “Microsoft” and inside of it browse to the folder called – “Template”. This is actually the location where the User templates are stored. (Another, alternate method to get to the template location is by selecting File ➜ Options ➜ Advanced ➜ Scroll all the way down ➜ Click File Locations under “General”. This will open up the file locations list. The User templates under the File types with the Location mentioned will be actually the default path where the user templates are saved and that is where the “normal.dotm” template should be. Double clicking on it or pressing the Modify button one can see the whole path and copy it from the address bar. After that instead of using the %appdata% one can use this copied path and directly reach to the location where “User templates” are stored.) Now after doing all this double click or click open by selecting “Normal.dotm”. This will open the template and we will be able to see that we are inside of it as it will say “Normal.dotm” at the top of the window.
Note: Sometimes people will browse out to the templates through windows explorer and double click them but that won’t open the template, it would simply run a copy of it. Thus, doing such won’t work, so the correct way is to browse to it from inside MS Word.Next, to do the changes to the “Normal.dotm” template we have to add a shape and customize it as per our requirements and set it as default by right clicking on it and save the document by clicking the save button. But now if we would close the document and proceed to create a new blank document it would look like the one that contains the custom shape as we actually changed the template and saved it. So every time as we will be using the template – “Normal.dotm” any changes done and saved by us will be permanent and will always show up. This won’t be good, so to avoid this we need to delete everything that we added inside the template – “Normal.dotm” and again save it by clicking on the save button and close out of it. Now just open a new document by selecting the - Blank document template and insert the shape that was made as default. Thus we will find that the default appearance for shapes is changed successfully and will remain as default for any document that is created hence forth.
Note: To add random text to a Word document use =rand() and press Enter.


Comments
Post a Comment
☑ Your comment will be accepted after moderation.